Showing posts with label Essie. Show all posts

Wednesday, February 26, 2014

Andy Nailed Marilyn!!! (Pop Art Inspired Nails)

Hello Lacquer Luvers! I know I always say this, but seriously, I am SO excited to share my mani with you guys today!! A few years ago I attempted to recreate one of Andy Warhol's pop art images (the one with the guns) on my nails and it was disastrous to say the least. I mean, just awful! I recently received a few plates from MoYou London to review and after looking at this one image of Marilyn Monroe I knew it was time to try another pop art look. This time I was successful! 


Now I don't know about you guys, but I am totally in love with this look! It incorporates so many things that I adore: bright colors, polka dots, eye catching imagery and of course, Marilyn. I think this mani was successful because my creative process this time was different than any other time I've created a manicure. I usually sit a bunch of colors and plates in front of me and have at it but this time I thought to sketch it out first. 


After I sketched the nails I went and grabbed a bunch of bright polishes. As you can see, I broke down the colors I would be using for each nail.  "B" is my base or background color,  "H" is hair & "F" is face. 


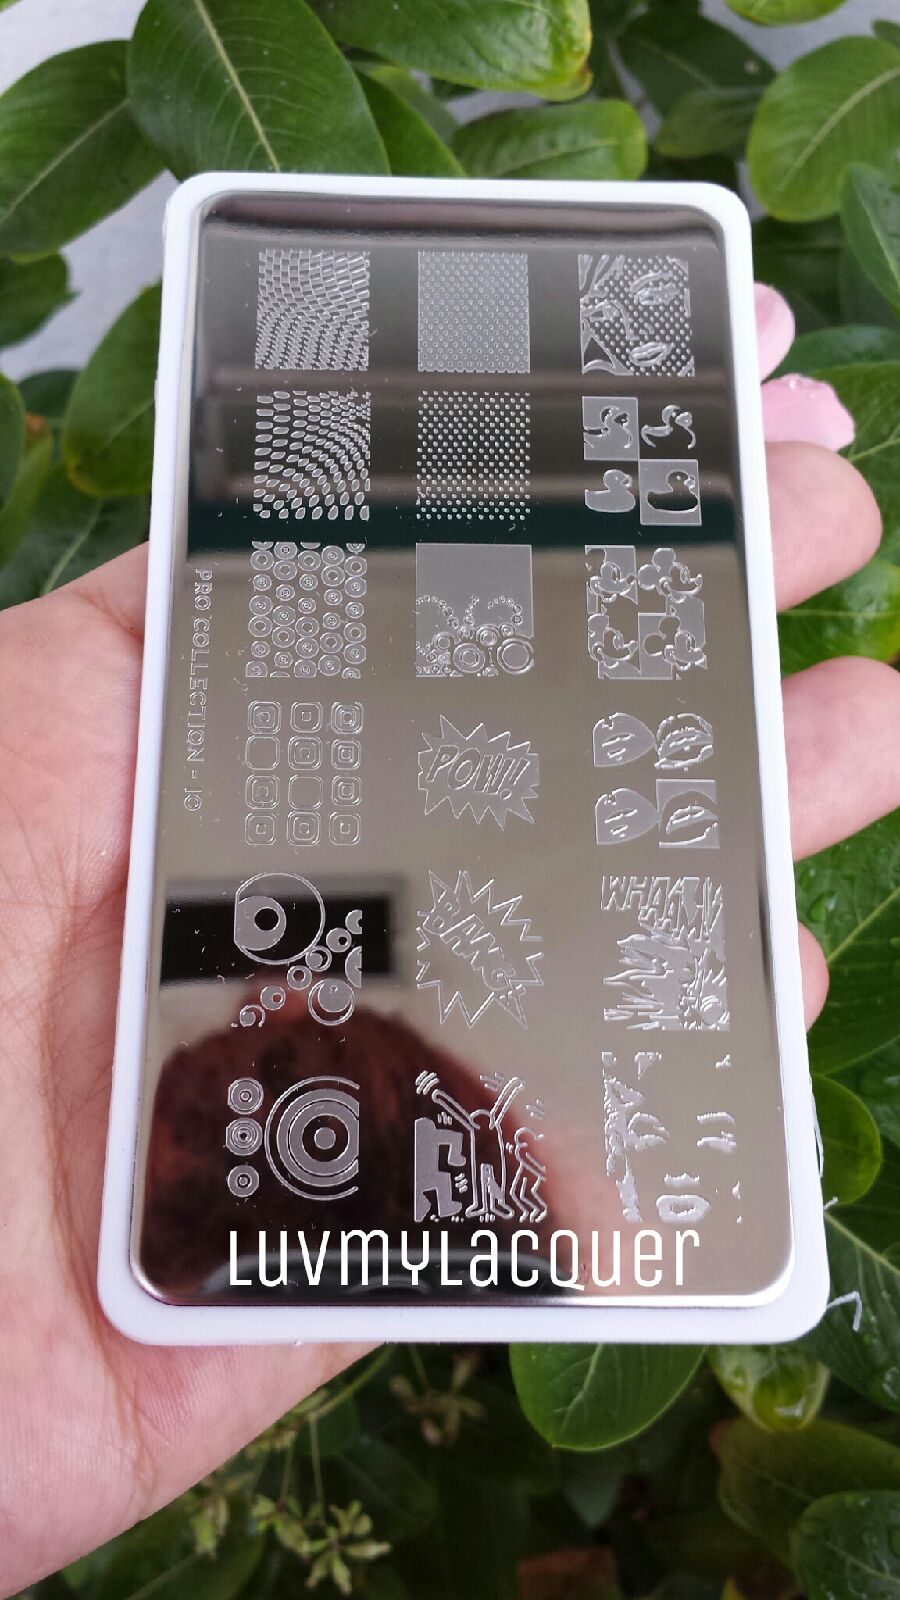
My manicure began with 2 coats each (starting from pinky to thumb) of Zoya Micky, Bettina Green Apple & Bettina Sunrise and 3 coats each of Essie Saturday Disco Fever & Essie Turquoise & Caicos. I honestly liked that the way it was, just fun bright colors! But I had to finish the task at hand so I started my nail art using MoYou London's Pro Collection 10 Plate and Konad Special Stamping Polish in black.


All of my Marilyn's were created using the stamping decal method and MoYou's Rebel Collection 02 plate. I made these Warhol-esque by using funky color combinations that really pop when put together. These are the polishes I used:

Turquoise - Essie Turquoise & Caicos
Purple - Essie Play Date
Yellow - Bettina Sunrise
Orange - Essie Saturday Disco Fever
Green - Bettina Green Apple
Pink - Zoya Micky


I've been wearing this mani since Saturday. Do I love it? Maybe a little too much! However, FedEx just left with a delivery so I will weep as I remove this. Do you guys have any MoYou stamping plates? I love the unique images that are on them and the wide variety of collections that they offer. MoYou plates retail for £4.99 & can be purchased on their website. As always, I hope you all enjoyed this post my dear Lacquer Luvers & I look forward to sharing my next post with you, xo!

~Jessica

Tuesday, February 11, 2014

Oxygen Bar Just Blue Me Away!

Hello Lacquer Luvers! As promised, I have my first Valentine's Day mani to share with you guys today. Before I get into it, I just want to say THANK YOU to each and every one of you! LuvMyLacquer hit 1,000 followers this weekend and I am still over-the-moon with excitement about that! You all have been so supportive since day one and I just wanted you to know how much I appreciate you for joining me on my blogging journey and having me as part of this amazing community. 


Today's manicure is a little unconventional when it comes to the Valentine's Day theme. It's not your typical pink, red and white manicure but it sure is cutesy and would be great to wear on the day for lovers, don't you think? Let me share with you how I achieved this look. 


This manicure began with two coats each of Essie Play Date and Bettina 190. The formula for both of these polishes is really nice. They went on smoothly and had a high gloss finish without a topcoat. I chose these colors to play up the fabulous glitter I used, Loaded Lacquer Oxygen Bar. Oxygen Bar is described as matte neon pink, matte neon blue, metallic purple, holographic lavender and periwinkle hex and squares in multiple sizes. I love everything about this polish. The neon glitters are incredibly eye catching while the periwinkle glitter lends a softer feel and the tiny holographic glitter keeps it playful.


These stamping decals were created with Pueen43, Cult Nails Tempest, Sally Hansen Blue Me Away!, & China Glaze Gothic Lolita. I applied a coat of Orly Prisma Gloss Silver because..well, one could never have too much holo sparkliness, right? I sealed all of cuteness in with a coat of my favorite glossy topcoat, HKGirl, and voilĂ !


Do you all love this mani as much as I do? I just love the glitter in Oxygen Bar and it was a great inspiration for this look. Did you know that you have a chance of winning this polish and lots more goodies by entering my Fan Appreciation Giveaway? Are there any looks you'd like to see from me for Valentine's Day? As always, I hope you all enjoyed this post my dear Lacquer Luvers and I look forward to sharing my next post with you, xo!

~Jessica

Sunday, January 26, 2014

Stamping With 3 Purples (AIS Challenge)

Hello Lacquer Luvers! Today I have yet another stamping decal manicure to share with you all, surprise surprise! I'm telling you, this method of stamping is so addicting. It has made me think of my plates in ways I would've never imagined. It's so much fun experimenting with limitless colors rather than my normal black/white stamping. 


So, some of you might have read the title of this post and are wondering what AIS is. AIS, otherwise known as Adventures in Stamping, is a nail stamping group on Facebook. Every week we vote on a theme and everyone posts their mani's on Sunday's. If you have questions about stamping or just want a place to admire everyone else's work, AIS is perfect for you! This week the challenge was to stamp using three purples. Ok, so I used more than 3 for this manicure but that's okay, right? I mean, there isn't a such thing as too much purple is there?


My mani began with 2 coats each of Zoya Heather & Monica. While that dried, I began to make my stamping decal. I used Zoya Monica along with Winstonia plate W111. The colors I used to fill in the decal are Zoya Heather & Essie's Play Date and DJ Play That Song. Once I placed the decals on my accent fingers, I applied one coat of Lacquerhead Polish Space Cadet 2.0 to the rest of my nails. Space Cadet 2.0 can be described as a deep Purple jelly full of various sizes and shapes of purple and holographic glitter. Although this polish is no longer in Lacquerhead's shop, I would recommend that you visit her site because there are plenty of other pretties to purchase or add to your wishlists. My manicure was topped with the best topcoat ever, HKGirl.


Although I love the way this manicure looks in pictures, I'm not as fond of it in real life. Everything is great except that the larger circle glitter doesn't lay as flat as I would like it to. It's a bummer but not enough for me to call this a fail. What do you all think of this manicure? Have you tried stamping decals yet? As always, I hope you all enjoyed this post my dear Lacquer Luvers and I look forward to sharing my next post with you, xo!

~Jessica

Tuesday, September 3, 2013

31DC2013 Day 3 - Yellow Nails

Hello Lacquer Luvers! Today's post will be as short and sweet as possible as it's a late one. I've had some Internet issues today and finally got my pics to load as I'm getting ready to end the day. Day 3 of 31DC2013 calls for yellow nails. If you recall a few weeks ago, I was on a yellow kick so I'm happy this made it into the challenge!


My manicure began with a base of Essie Feed Me followed by 2 coats of Essie Marshmallow. Next I began to create a gradient using Marshmallow, Sally Hansen Buttercup & Zoya Darcy with the help of a makeup sponge. I repeated this process 3 times. 


Next I applied one coat of Orly Prisma Gloss Silver over my accent nail. I used Konad Special Stamping Polish in white & RuiZ03 from BornPrettyStore for the polka dots and Mash46 for the flower design on my accent nail. My manicure was topped with 1 coat of HK Girl topcoat.


I seriously am deeply in love with this manicure! I'm really happy with how my gradients have been coming out lately. I've been working so hard on those! I'd love to know what you all think of my yellow nails! Would you wear this? As always, I hope you all enjoyed this post my dear Lacquer Luvers and I look forward to sharing my next post with you, xo!

~Jessica

Friday, August 23, 2013

MoYou Comically Nail'd It!

Hello Lacquer Luvers! A few weeks ago I  came across a post in AIS (Adventures in Stamping) about some awesome new stamping plates by a company called MoYou London. Once I saw the designs I HAD to have two of the plates and today I'm showing off the first mani I did using one of them.


Please excuse my frizzy hair in the picture, it was early in the morning and I couldn't wait to photograph the plates and get started on a manicure lol. Anyway, as you can see, these plates are shaped differently than most. They're rectangular with a plastic underside which is nice protection from the sharp edges some plates are known to have.


I began my manicure with a base of Essie Feed Me followed by a skittle manicure using the following colors: (thumb) Essie Shake Your $$ Maker, (index) Essie Bouncer It's Me, (middle) Zoya Pippa, (ring) Zoya America, (pinky) Saturday Disco Fever. I used two coats for the Zoya nails and three coats for the ones polished with Essie shades.


I used the dotted image from MoYou Pro Collection - 10 on my middle and ring fingers then used the POW! and BANG! images over the dots using Konad Special Stamping Polish in white. I used nail art stripers and a dotting tool to freehand the cartoonish look on the rest of my nails following this tutorial by CutePolish. My manicure was complete with a coat of HKGirl topcoat.


Waaaait! No, now it's complete with a coat of Hard Candy's Matte-ly In Love!! I think the matte topper did so much to make the comic book nails look more..cartoonish. I can't wait to try out more images on this plate and show you guys the other one that I got! As always, I hope you all enjoyed this post my dear Lacquer Luvers and I look forward to sharing the next one with you, xo!

~ Jessica

Saturday, August 3, 2013

Happy International Nail Art Day!!!

 Hello Lacquer Luvers and Happy International Nail Art Day! The lovely @nailsbymimi (check out her awesomeness on Instagram) came up with the brilliant idea of having a holiday to celebrate something we polishaholics all love, nail art! You all know that while I very much enjoy swatching beautiful nail polishes, my heart is in the art. I love expressing myself through it and couldn't pass up the opportunity to join in on the festivities today!


Today's look features three forms of nail art that took me so many practice sessions to get right, each earning their very own lane in my nail art world. I absolutely LOVE these types of nail art and think they're all equally fun to do. I've got some gradient/stamping/water marbling goodness going on for INAD and I love how my nails came out for this special day!


I started with a base of Essie Feed Me followed by two coats each of China Glaze Tantalize and Essie Marshmallow on my accent finger. I created a gradient on my accent finger with Marshmallow, Tantalize Me & Gothic Lolita with the help of a makeup sponge. Once that dried, I topped it with Orly's Prisma Gloss Silver for some scattered holo glitter prettiness! 


Next I began to water marble my nails using the colors mentioned above. For those of you who have ever tried marbling, I'm sure you can agree that it is one of those things you have a love/hate relationship with lol! I've always loved the final look of this beautiful art though and don't mind the process of getting it just right because it's so mesmerizing to look at all day!


I went back to my ring finger for the stamping part of my manicure. With the help of MASH-41 & some Konad Special Stamping Polish in white, I went over my holo glitter gradient with this stunning floral image. My mani was complete with a coat of the scattered holo polish over my water marbled nails and a final coat of HKGirl topcoat on all of them.


I had so much fun coming up with this look for International Nail Art Day and am so happy that we have a day to call our own! Nail art has been a way for me to express how I'm feeling through color and is most definitely my favorite "me time". There was a recent rumor going around, someone said nail art was dead. I guess we're proving them wrong today! Don't forget to tag your nails with #INAD on Instagram for those of you joining in. As always, I hope you enjoyed this post my dear Lacquer Luvers and I look forward to sharing my next post with you, xo!

~Jessica

Wednesday, May 22, 2013

Sugar Daddy Just Got Fancy!

Hello Lacquer Luvers! Today's post is a little different than what I've been posting recently. Every now and then my nails crave a nice nude polish and a break from the colorful designs I normally gravitate to. I'm loving the look I came up with and hope that you all do, too!


My mani began with a base of Essie Feed Me followed by two coats of Sugar Daddy. Oh, Sugar Daddy, how I love thee! This polish in french nude perfection. It applied so nicely and it gave my nails a gorgeous sheer coat of a tiny bit of color. I love that this polish hid a little bit of yellowing on my nails. If I ever had to pick the perfect base for a french mani this is definitely it!


The design I picked for this mani is so intricate and beautiful. I chose to use Pueen image plate PUEEN18 and got it on my nails with Konad Special Stamping polish in black. The intricacy of this design and how the black pops off of the nude base made for such a lovely combination. It looked fancy yet modern. This mani was complete with a coat of Essie Good To Go topcoat.


Would you wear this mani? What do you think of nude/sheer polishes? I know alot of girls, including myself, absolutely live for color on their nails. Every now and then it is nice to have a little palette cleanser though. I'm loving these image plates by Pueen as well. They are all etched very nicely and the designs are fabulous and unique! Pueen currently offers three sets of plates, along with a few random plates, that can be purchased here if you are interested. International lovelies can place there order for these plates here. As always, I hope you all liked this post my dear Lacquer Luvers and I look forward to sharing my next post with you, xo!

~Jessica  

Monday, February 20, 2012

Beach Inspired Water Marble

Hello Lacquer Luvers! How are you all doing on this fine Monday? I am really excited about my post today because it was inspired by my all-time favorite place. Before I get into my manicure, I want to share something with you all. Yesterday we decided to take a trip to the beach. Little did we know, there was a kite festival going on. Tyus (my son) was so excited to see all of the kites in the sky but not as excited as he was to get his feet into the water. We sat out for a bit and as we were enjoying the sights an older gentleman approached us & asked if Tyus would like to fly a kite. It made my heart melt to know that there are genuinely nice people in this world after all the terrible things we see/hear everyday. The gentleman saw how happy Tyus was and told him that he wanted him to have his kite. It really was the sweetest thing ever!


In the midst of our fun, I chipped the sides of my pointer and middle fingers. Any other time I would've been sad about it but how could I be when I'm looking at this:


I absolutely love love love the beach! It's the one place where everyone in my family has a smile on their face for hours on end.

On to my mani! I bet by now you can guess what I was inspired by today (well, besides the title of this post, haha!). The beautiful sand and the gorgeous shades that range from seafoam green to aqua to dark blue is the story behind my nails for the day. After filing my nails down because of the two chips, I began my manicure with a base of Essie Grow Faster followed by two coats of OPI Samoan Sand. Next I used Samoan Sand, Bettina Ocean, Bettina Aqua, and Essie Turquoise & Caicos to create my beach inspired water marble. I topped my manicure with a coat of Essie Good To Go topcoat.


The tip of my pointer finger looks like a wave! How cool is that? =)

L-R OPI Samoan Sand, Bettina Ocean, Bettina Aqua, Essie Turquoise & Caicos

Did you ladies notice that the colors I used to create my mani today are beach related? That's one of my favorite parts of this one! It reminds me of all the fun we had yesterday and the great memories that were made. What do you think luvs? What is your all-time favorite place to visit & what colors would you use to translate it to your nails? As always, I hope you all liked this post my dear Lacquer Luvers and I look forward to sharing my next post with you, xo!

~Jessica

Sunday, February 12, 2012

You Give Love A Bad Name (Anti-Valentine's Day Nails)

Hello Lacquer Luvers! I hope you all are having a great weekend so far. Today I have an anti-Valentine's Day manicure to share with you. I decided to do a mani for my girls who absolutely hate this holiday because, well, we all know what it feels like to have been hurt or to not have someone special to show your affection to on that day, right? My mani was inspired by the lyrics of Bon Jovi's "You Give Love A Bad Name".


For my mani today, I wanted to simulate a "shot through the heart." I began my manicure with a base coat of Essie Grow Faster. I used two coats of Bettina Onix (black) & three coats of Matte (white) as my base colors.  On my pinky is the gun which was done with Konad plate S5 & their Special Stamping Polish in black. I used Sally Hansen's Color Quick Chrome Pen in gold along with Bundle Monster's BM202 plate as the gunfire on my pinky, ring, and middle fingers. The heart on my middle finger was done with Kiss Nail Art striper in red & BM202. The blood red splatter on my index finger was done with Essie's Russian Roulette.


"You're a loaded gun, yeah
There's nowhere to run
No-one can save me, the damage is done

Shot through the heart, and you're to blame
You give love a bad name
I play my part and you play your game
You give love a bad name"
-Bon Jovi


I'm very pleased with the outcome of this manicure. I think I pulled off the concept that I was going for. What do you all think Lacquer Luvers? Did I do this song justice with my mani? I hope I did you proud my anti-Valentine's Day luvs! As always, I hope you all liked this post my dear Lacquer Luvers and I look forward to sharing my next post with you, xo!

~Jessica

The song that inspired me today: http://youtu.be/KrZHPOeOxQQ

Thursday, December 15, 2011

I Am Sew Psyched About As Gold As It Gets

Hello Lacquer Luvers! I missed you girls yesterday! I was having some technical difficulties but now that it's handled I'm back and ready to share today's post with you all. Today's nails feature two polishes by Essie, Sew Psyched and As Gold As It Gets. Let's go on to the nails, shall we?


For my mani, I began with a coat of Essie Grow Faster as by base. I applied two coats of Sew Psyched for full opacity. Sew Psyched can best be described as a cashmere-soft sage pewter. It has gray micro-shimmer throughout it that I really really love. The formula and application was very nice. This polish is from Essie's Fall 2010 collection. I really like this color. It's different than any other green in my stash and you all know how I love green.


Once Sew Psyched dried, I layered one coat of As Gold As It Gets over it. As Gold As It Gets is part of Essie's Luxeffects Collection. Luxeffects is a set of 5 glitter top coats that are sure to dazzle during the holiday's and is perfect for layering and giving all of your polishes a different look. As Gold As It Gets contains gold flakies and gold micro-glitter in a clear base. The flakes vary in size and the iridescence from the micro-glitter sometimes reflects a flash of a reddish bronze in the sun. The formula on this was a little thick but was not hard to apply. No top coat was used in these photos.


Pretty, isn't it? As mentioned before, this collection was created for layering and I wanted to show you how it looked over other colors. From left to right we have As Gold As It Gets layered over Sinful Colors Burgandy Apple, WetNWild Ebony Hates Chris, Revlon All Fired Up, & Essie Sew Psyched.


I really love layering this polish over other colors. It gives cremes a much more dramatic appearance that is perfect for this time of year. I also love that its a gold flakie, something that I don't have in my collection. How do you ladies like this polish? Which color do you like it layered best over or which color would you like to layer it over? As always, I hope you all liked this post my dear Lacquer Luvers and I look forward to sharing tomorrow's post with you, xo!

~Jessica